SEO: Google's Next Big Move archive copy

Diposting oleh De Journal di 20.24

Rabu, 11 Februari 2009

By David Leonhardt

(Will your website be ready, or will you be playing catch-up six months too late?

November 2003 might go down in history as the month that Google shook a lot of smug webmasters and search engine optimization (SEO) specialists from the apple tree. But more than likely, it was just a precursor of the BIG shakeup to come.

Google touts highly its secret PageRank algorithm. Although PageRank is just one factor in choosing what sites appear on a specific search, it is the main way that Google determines the "importance" of a website.

In recent months, SEO specialists have become expert at manipulating PageRank, particularly through link exchanges.

There is nothing wrong with links. They make the Web a web rather than a series of isolated islands. However, PageRank relies on the naturally "democratic" nature of the web, whereby webmasters link to sites they feel are important for their visitors. Google rightly sees link exchanges designed to boost PageRank as stuffing the ballot box.

I was not surprised to see Google try to counter all the SEO efforts. In fact, I have been arguing the case with many non-believing SEO specialists over the past couple months. But I was surprised to see the clumsy way in which Google chose to do it.

Google targeted specific search terms, including many of the most competitive and commercial terms. Many websites lost top positions in five or six terms, but maintain their positions in several others. This had never happened before. Give credit to Barry Lloyd of SearchEngineGuide.com for cleverly uncovering the process.

For Google, this shakeup is just a temporary fix. It will have to make much bigger changes if it is serious about harnessing the "democratic" nature of the Web and neutralizing the artificial results of so many link exchanges.

Here are a few techniques Google might use (remember to think like a search engine):

  1. Google might start valuing inbound links within paragraphs much higher than links that stand on their own. (For all we know, Google is already doing this.) Such links are much less likely to be the product of a link exchange, and therefore more likely to be genuine "democratic" votes.

  2. Google might look at the concentration of inbound links across a website. If most inbound links point to the home page, that is another possible indicator of a link exchange, or at least that the site's content is not important enough to draw inbound links (and it is content that Google wants to deliver to its searchers).

  3. Google might take a sample of inbound links to a domain, and check to see how many are reciprocated back to the linking domains. If a high percentage are reciprocated, Google might reduce the site's PageRank accordingly. Or it might set a cut-point, dropping from its index any website with too many of its inbound links reciprocated.

  4. Google might start valuing outbound links more highly. Two pages with 100 inbound links are, in theory, valued equally, even if one has 20 outbound links and the other has none. But why should Google send its searchers down a dead-end street, when the information highway is paved just as smoothly on a major thoroughfare?

  5. Google might weigh a website's outbound link concentration. A website with most outbound links concentrated on just a few pages is more likely to be a "link-exchanger" than a site with links spread out across its pages.

Google might use a combination of these techniques and ones not mentioned here. We cannot predict the exact algorithm, nor can we assume that it will remain constant. What we can do is to prepare our websites to look and act like a website would on a "democratic" Web as Google would see it.

For Google to hold its own against upstart search engines, it must deliver on its PageRank promise. Its results reflect the "democratic" nature of the Web. Its algorithm must prod webmasters to give links on their own merit. That won't be easy or even completely possible. And people will always find ways to turn Google's algorithm to their advantage. But the techniques above can send the Internet a long way back to where Google promises it will be.


source http://www.seo-writer.com/reprint/seo-google.html

Magic lighting effect in photoshop

Diposting oleh De Journal di 20.44

Senin, 09 Februari 2009

Well what I want to show here is how to create a nice light and magic effect.

1 - Create a radial gradient, in this case from a purple to a really dark purple

2 - Here I added a really cool Icon of a magic hat from the Crystal Clear Collection by Everaldo

3 - Add some text, I used the source code of a site to get the text and apply the Distort >Wave filter


Create two stripes of text

4 - Rotate and place the text

5 - Add some light using glow : Use different values for each line of text, the secret here is the blending option COLOR DODGE..


Change the values of Spread, Size and Range

6 - Group the 2 lines of texts and with one apply a mask to make the stripes disappear at their ends.

7 - With the other group of text apply a gausian blur, after that delete some parts to show the non-blury text.


This will add a movement feel to the text, like they are really being magicaly created.

8 - Create a new layer below the text and with a regular big brush like 100px add a spot of light in white.


The layer must be below the text, otherwise the glow will not affect the white spot

9 - Make some smoke again, I used the eraser, I could've used the liquify as well

10 - Create a cloud: to do that make use a marquee with feather set to a value bigger than 20 and apply the render>clouds holding the command key(mac), ctrl key(win).


The same as the previous post, and the most important thing apply the COLOR DODGE blending options on it

11 - Sparks: For the sparks create a brush, play with the shape dynamics, scatering, and other dynamics. After that, apply a Outer Glow and Inner Glow to create the magic effect.

End - The result is really simple but at the same time it looks beautiful.

The whole process took me about 35 minutes, one thing I think is really cool is to apply the color dodge blending option to folder, and put blured elements inside of it. Using it you can create some really amazing light effects.

source http://abduzeedo.com/magic-lighting-effect-photoshop

How to fast Indexing Search Engine to website / blog

Diposting oleh De Journal di 21.08

Senin, 19 Januari 2009

1. Create a link on that page is indexing search engines to the direction of our new website. We emulate the profile (for example: “www.friendster.com / okam” is a good example to link to the blog or our website. Because this page usually has terindeks search engine. The higher the position of the pages in search engines (PageRank) means the more quickly we terindeks new webiste.
You can contact your friend is terindeks the blog search engines to install a link to you.
* If the profile / emulate in your blog / Multiply terindeks already, you can install a link in your profile is.
* Every fill your blog. Google Analytic is a plug-in idea will always monitor your activities.
2. Submit manually through the following URL (FREE):
* Google: http://www.google.com/addurl.html
* Yahoo: http://search.yahoo.com/info/submit.html
* AltaVista: http://www.altavista.com/addurl/
* DMOZ / ODP: http://www.dmoz.org/add.html
* Alexa: http://www.alexa.com/support/get_archive.html
* MSN: http://search.msn.com/docs/submit.aspx
3. Submit the URL pay:
* Lycos: http://home.lycos.com/addasite.html
4. Before downloading you submit the URL of your website, make sure that:
* Website or blog so you have (not under construction).
* There are no dead links in your website.
* Website or made to your search engine friendly.

After you submit your URL, wait with patience. If the website you will be lucky terindeks in less than 24 hours, if not prosper you must wait 3 months, possibly even your application is not accepted Search Engine. You can re-submit if within 3 months of your website not appear in search engines.

What should be done during the wait? Building the link. Can be suddenly your website because nongol not submit manually, but because of a link from another website.

Congratulations to try.

Free Chart and Graph Solutions

Diposting oleh De Journal di 21.06

Charts and graphs help the user to visualise data in a more meaningfull way than rows of text statistics. They are extensively used in reporting applications, for displaying earnings, website traffic etc - here we take a look at some pre-made scripts and frameworks available to the web designer or web application developer …


Open Flash Chart - Open Flash Chart, is open source. It is free to use and you get the source code to fiddle with

114.jpg


amCharts - Pie and donut charts, line and area charts, column and bar charts, scatter and bubble charts and an interactive map tool are all free for download

29.jpg


Php / Swf Charts - PHP/SWF Charts is a simple, yet powerful PHP tool to create attractive web charts and graphs from dynamic data. Use PHP scripts to generate or gather the data from databases, then pass it to this tool to generate Flash (swf) charts and graphs. Any other scripting language (ASP, CFML, Perl, etc.) can be used with XML/SWF Charts (the XML version of the same tool.)

33.jpg


Fusion Charts Free - FusionCharts Free is a flash charting component that can be used to render data-driven & animated charts for your web applications and presentations

43.jpg


Yahoo! UI Library: Charts - The YUI Charts Control visualizes tabular data on a web page in several possible formats including vertical columns, horizontal bars, lines, and pies. Notable features include support for the DataSource Utility, customizable series and axes, a customizable mouse-over datatip, combination charts, and skinning

53.jpg


Flot - Flot is a pure Javascript plotting library for jQuery. It produces graphical plots of arbitrary datasets on-the-fly client-side. The focus is on simple usage (all settings are optional), attractive looks and interactive features like zooming

63.jpg


SAC - Simple accessible charts, An easy, fast and accessible way to display simple Data and beautify them with CSS. Works fine in FF, IE 7/6, Opera 9 tested on WIN XP

73.jpg


Similie - Timeplot is a DHTML-based AJAXy widget for plotting time series and overlay time-based events over them (with the same data formats that Timeline supports)

82.jpg


PlotKit - PlotKit is a Chart and Graph Plotting Library for Javascript. It has support for HTML Canvas and also SVG via Adobe SVG Viewer and native browser support

92.jpg


Libchart - Libchart is a free chart creation PHP library, that is easy to use

102.jpg

Click here for source

6 Creative Reasons for Applying Blur to Photos

Diposting oleh De Journal di 21.04

Blurring, at it’s most fundamental level is the softening of an image. It is standard procedure to use a very slight blur on photos straight off your digital camera as often they are overly sharp. Sharpness, of course, isn’t a bad thing but it is more beneficially applied at the end of your retouching sessions than at the beginning.

There are many other (more creative) uses for blur though. Here are some examples.

To Imply Depth

Depth of field looks best when done in the camera, but when compositing photographs, you can imply distance and depth by blurring further away objects.
blur-applyingdepth.jpg

To Make Type More Readable

Setting type over a busy image can make the type hard to read. Blurring the image behind the type can make it more readable and make for a nice effect. Look at this example from PSDTuts.
blur-readabletype.jpg

To Imply Speed

Even if the object in a photo is in perfect focus, applying a direction (or “motion”) blur can imply speed.
blur-implyspeed.jpg

For An Appealing Background Image

Photoshop offers some interesting blur effects with their “Shape Blur” filter. Look how the martini splashes turn into squares here, which could make for a very nice background image.
blur-backgroundeffect.jpg

For A Surreal Feeling

Selective blurring like the “Surface Blur” filter in Photoshop can apply really nice effects to some photos. See below how this effect makes the football players seems surreal with some areas blurry and some sharply in focus.
blur-surreal.jpg

For An Illustrative or Cartoony Feel

Another selective blurring filter in Photoshop is the Smart Blur filter. This is good for removing fine detail in areas of similar color while keeping edges sharp. This can make for a very nice illustrative effect on photos or even cartoon-like in it’s extreme.
blur-cartoony1.jpg

Click here for source

Create Temperature Converter with VB

Diposting oleh De Journal di 21.01

With winter around and daily temperature change has become a concern for many people especially those who travel a lot. They are constantly checking out temperature readings everyday However, different parts of the world often use different temperature scales, some of them use Fahrenheit and some use Celsius, so the readings can be confusing. Therefore, it is nice if we have a program that can convert Celsius to Fahrenheit and vice versa. And I have done just that using Visual Basic 6. The code is like this:

Private Sub Command1_Click()
Dim cel, Fah As Single
cel = Val(txtC.Text)
Fah = Val(txtF.Text)

If txtC.Text <> “” And txtF = “” Then
Fah = ((9 / 5) * cel + 32)
txtF.Text = Round(Fah, 1)
Else
cel = (5 / 9) * (Fah - 32)
txtC.Text = Round(cel, 1)
End If

End Sub

Private Sub Command2_Click()
txtC.Text = “”
txtF.Text = “”

End Sub

click here for source

Creating A Simple Web Browser

Diposting oleh De Journal di 21.00

Basically everyone have to navigate the Internet using commercially produced web browsers such the Internet Explorer produced by Microsoft or those open source browsers designed by the experts such FireFox , Opera and the latest Chrome created by Google. However, isn’t it cool that if we can create our very own web browser that we can customize to our own taste ? Yes, you can do that in VB2008, and pretty easy too. In this chapter, I will show you how to create a simple web browser and get it running at in a few minutes. In the next chapter, I will show you how to add more features and functions to your existing web browser to make a more sophisticated one.

First of all, start a new project in VB2008 and name it with any name you like. Here I am just using the name webbrowser. Change the name of Form1 to webbrowser and the text property to My First Web Browser and set its size property to 640,480. Next, you need to add an engine so that your web browser can connect to the Internet, and this very engine is the WebBrowser control, located on the Toolbox on the left side, set the size property to 600,400. Next, drag a text box and place it at the bottom of the WebBrowser control, this will be the address bar where the user can enter the URL. Lastly, place a command button beside the text box and label it as Go. The design interface is shown below:

Figure 19.1: The Design Interface


The code for the web browser is surprisingly simple, it is only a single line code! Double click on the Go button and key in the following code:

Public Class Form1

Private Sub Button1_Click(ByVal sender As System.Object, ByVal e As System.EventArgs) Handles Button1.Click

myWebBrowser.Navigate(TextBox1.Text)

End Sub

End Class

Now run the the program , type in any URL and click the Go button. You will be able to browse any web page you want.

Figure 19.2: The Runtime Interface

click here for source

Gmail Rolls Out Themes

Diposting oleh De Journal di 20.57

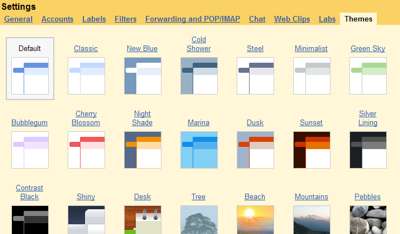
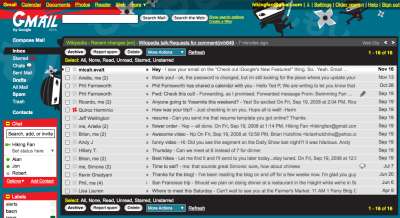
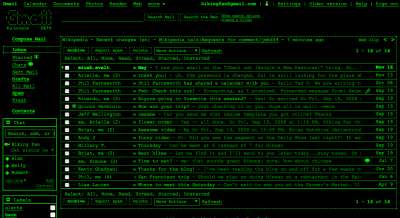
A couple of months ago it was mentioned here that Google’s web mail client Gmail might get themes, like a black-and-green terminal view, and the waiting time seems to be over soon – Google announced they’ve started to roll out this feature. While I don’t see it in my Gmail yet (the screenshots in this post are courtesy of Andris and Google), it’s supposed to be added to a Themes tab in your settings. Note some themes are dynamic and may change throughout different times of the day. “We’ve also done a minor facelift to Gmail’s default look,” Google adds.

click here for source

Google’s Life Photo Archive

Diposting oleh De Journal di 20.56

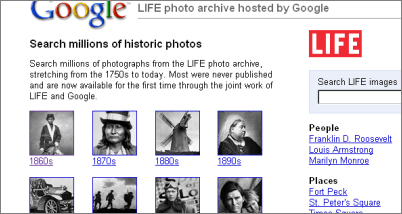
Google together with Life magazine has published a photo archive of, according to Google, around 2 million photos (with around 8 million supposed to be released in the future). Many of these photos have never before been published, Google says. The actual search behind this is a regular Google image but with the parameter source:life in the query.

Colin in the forum writes “This is pretty cool to be able to browse through each decade of pictures” but notes you’re “limited to 200 results per search”. Colin adds:

Once you click on any photo result, it will load a landing page giving you more details about that photo and the chance to rate the photo with up to a 5 star rating. You can then click on the photo to view an even larger version. I hope over time they remove the 200 result limit. Otherwise you have to constantly tweak your search query to see any other photographs similar to your query. Besides photographs, they also scanned in TIME magazine covers.

As many photos are quite old, this also means many should have passed into the public domain zone, meaning you may be allowed to copy, edit, and republish that portion of the photos any way you like, including for commercial uses. Wikipedia says that “the copyright in a published work expires in all countries … when … The work was created and first published before January 1, 1923, or at least 95 years before January 1 of the current year, whichever is later”. However, Wikipedia also mentions some exceptions to these rules.

click here for source

Skin Retouching Tips In Photoshop CS4

Diposting oleh De Journal di 20.54

A fellow photographer was showing me some images the other day that he had captured with a camera that uses a plastic lens. The images had a certain attraction.

Although the images had some pretty shocking vignetting and heavy distortion he was drawn to the beautiful liquid smooth tones that the plastic lens was offering up. Most women who look at photographs of themselves would agree that crunchy detail is just not a good look.

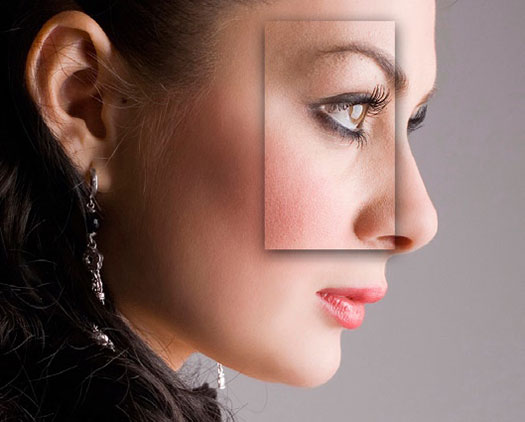
A digital camera can be a very cruel tool that can capture way too much information. Most people would prefer their skin to appear smooth, but not featureless, and will thank the photographer when they can reveal a skin texture that does not shout its detail to the viewer.

The craft of professional skin retouching is the ability to render perfect skin without giving your model the appearance of a plastic-fantastic shop window mannequin.

Skin Retouching Tips In Photoshop CS4

The image used in the project is a section of a larger image from iStockphoto.com (image number 05009631). A 12-megapixel DSLR with a professional grade lens at point blank range and a generous amount of in-camera sharpening is a very cruel combination for showing every minor imperfection in the skin’s surface (check out the nose). The technique in this tutorial can be used at full throttle to render the skin suitable for use in a skin care advertisement, or toned down a little to return the skin to something approaching normal (rather than how the camera lens captured it).

Step 1
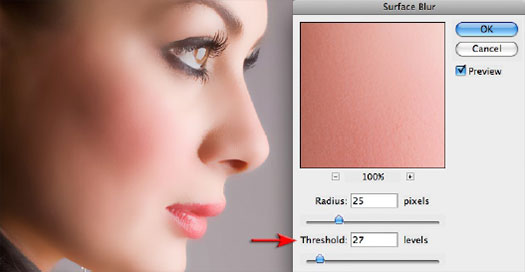
Start the process of smoothing the skin by duplicating your background layer using the keyboard shortcut Ctrl + J (PC) or Command + J (Mac) and then go to Filter > Blur > Surface Blur. This filter, unlike the Gaussian Blur filter has a ‘Threshold’ slider that, if used correctly, will leave edges crisp and sharp whilst blurring the surfaces inside the edges. This will ensure there are no nasty haloes around the edges of your subject as a result of the blurring process.

Skin Retouching Tips In Photoshop CS4

Step 2
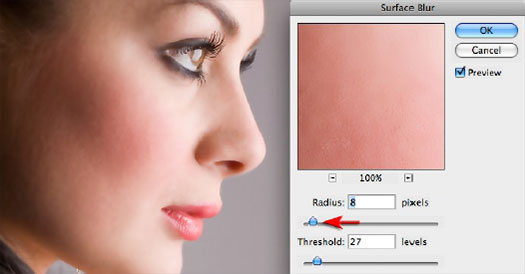
It is important to get the balance right between the Radius and the Threshold slider settings for each and every image (there is no one ‘perfect recipe’ that suits every image). To get a feel for what these two sliders do, set them both to a value between 20 and 25. Now move the Radius slider lower until you detect the surface tone becoming ‘mottled’ or ‘blotchy’ and then move it higher again until the surface appears very smooth. Finding the minimum radius that renders the surface smooth is your goal here.

Skin Retouching Tips In Photoshop CS4

Step 3
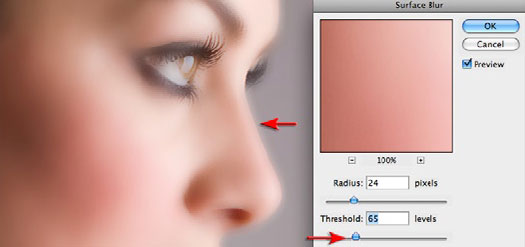
Now drag the Threshold slider higher until you see haloes appear around the edges of your subject. Back the slider off to a point where all of the haloes disappear. If you continue to move the slider lower, after the haloes have disappeared, you will start to re-introduce the finer detail that was removed the by the Radius slider. Try to make the surface as smooth as possible at this stage as we will reintroduce the texture of the skin in a later step.

Skin Retouching Tips In Photoshop CS4

Step 4
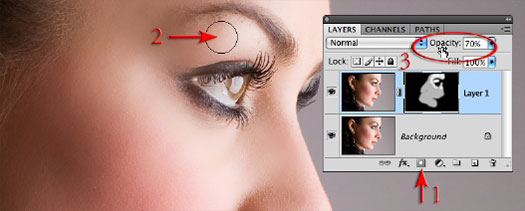
Select OK to apply the Surface Blur filter and then hold down the Alt key (PC) or Option key (Mac) and click on the Add layer mask icon at the base of the Layers palette. This will add a layer mask filled with black that conceals the surface blur on Layer 1. Select white as the foreground color in the Tools palette and then choose a soft-edged brush and set the opacity to 60-80% in the Options bar. Paint to reveal the blur in the areas of the skin only. You do not need to be too critical about accuracy as areas of fine detail such as the eyelashes and the contours of the face have already been preserved on the Surface Blur layer. You will, however need to avoid painting over areas such as the lips to ensure fine detail is not lost in these areas. Paint a second time to reveal additional softening where needed.

Skin Retouching Tips In Photoshop CS4

Step 5
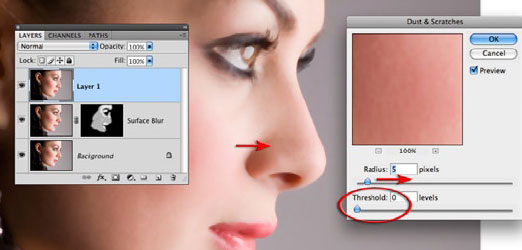
In this step we will eliminate minor imperfections in the skin that the surface blur filter could not smooth over. With the top layer selected hold down the Ctrl + Alt + Shift keys (PC) or Command + Option + Shift keys (Mac) and press the letter E to stamp the visible elements of the project to a new layer. Go to Filter > Noise > Dust & Scratches and set the Threshold slider to 0. Raise the Radius slider just enough to remove any large skin imperfections. Don’t worry about the lack of texture at this point in time.

Skin Retouching Tips In Photoshop CS4

Step 6
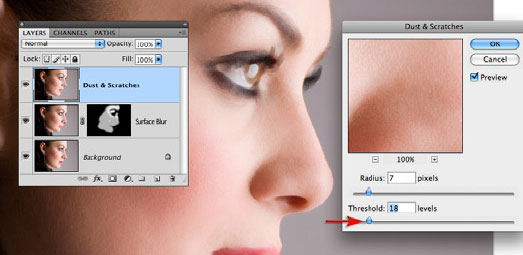
Raise the Threshold slider to reintroduce surface texture but stop just short of the point where the larger skin imperfections start to reappear. Select OK to apply the filter and then hold down the Alt/Option key and click on the ‘Add layer mask’ icon at the base of the Layers palette to conceal the effects of this layer.

Skin Retouching Tips In Photoshop CS4

Step 7
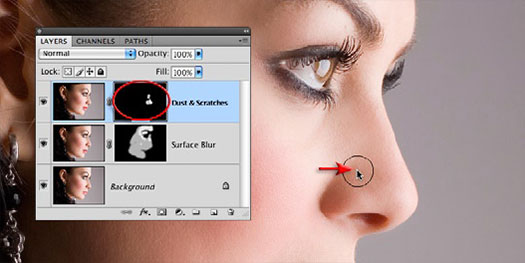
Select the Brush tool and white as the foreground color in the Tools palette and set the Opacity to 100% in the Options bar. Zoom in to 200% and paint to remove any imperfections. Hold down the Spacebar and click and drag to move the image in the image window so that you can navigate around the surface of the skin to look for additional imperfections. The skin should now be rendered smooth but with realistic surface texture and free from all minor imperfections.

Skin Retouching Tips In Photoshop CS4

The skin should now be rendered smooth but with realistic surface texture and free from all minor imperfections.

click here for source

Using Clipping Masks to Place Images Inside Shapes or Text

Diposting oleh De Journal di 20.53

One of my favorite options inside Photoshop is clipping masks. Clipping masks can be used for a variety of reasons. They are used to place an image inside text, or to place an image inside a shape. Clipping masks can also be used to edit a selected portion of an image.

In this tutorial, we are going to use a Clipping Mask to place an image inside a shape.

Place Image Inside Shapes

Place Image Inside Shapes

In Photoshop, start a new document. Let’s start with a document size of 800 x 600 with a white background. Our goal is to place a picture of aspen trees inside a leaf shape. To set up a clipping mask, we place the shape below the image. Let’s draw the shape first.

Under the rectangle tool, select the Custom Shape Tool. From the Tool Options bar across the top, click on the down arrow next to the Custom Shape. This opens up the Shapes Panel.

Select Custom Shape

Select Custom Shape

To find a leaf shape, click on the Shapes Panel Menu (arrow at top right of panel) and select Nature to see the nature shapes.

Select Nature Shapes

Select Nature Shapes

Select a leaf from the Nature Shape panel.

Select Leaf Shape

Select Leaf Shape

In the new document window, click and drag with the shape tool to create the leaf shape. Let’s rotate this leaf. To do this, select Edit/Free Transform (ctrl-t) and click and drag to the right outside the bounding box area to rotate the leaf to the right.

Draw and Rotate Shape

Draw and Rotate Shape

Now that we have the shape, let’s open the image that we want to place inside the shape. After opening the image, move the image into the new document with the move tool (by clicking and dragging on the image) and place the image over the leaf shape.

Place Image over Shape

Place Image over Shape

The layers palette indicates that the image is placed above the shape layer. At this point we cannot see the shape in the new document window since the image is covering up the leaf shape.

Layers Palette

Layers Palette

Image Over Shape

Image Over Shape

The next step is to create the clipping mask which will place the image inside the leaf shape. To do this, make sure the active layer is the image layer and click on the layers palette menu to select Create Clipping Mask.

Create Clipping Mask

Create Clipping Mask

This immediately places the image inside the shape below it:

Image Inside Leaf Shape

Image Inside Leaf Shape

The layers palette indicates a clipping mask by moving the image to the right and placing a down arrow to the left of the image:

Repeat the steps above to create a second leaf. The only difference in the second leaf is that the leaf is rotated to the left instead of the right. When completed, the layers palette shows the two clipping masks:

Layers Panel

Layers Palette

Our final image looks like this:

In the example below, text is used instead of a shape. When placing images inside text, be sure to use a font that has significant width.

Image Inside Text

Image Inside Text

Clipping masks are non-destructive. This means we can remove the clipping mask if we change our mind. To remove a clipping mask, select the clipping mask layer (the image layer). From the layers palette menu (click on the three lines at the top right of the layers palette), select Release Clipping Mask. This will remove the clipping mask and the entire image will now be visible.

Click here for source